Prerequisites
In order to use the quick dispatch plug in you will need the following: -
- The views feature enabled on your licence.
- The Views Feature enabled within your feature setup.
- Permissions to access the Views feature.
- View and interact permission with the Quick Dispatch Plugin.
- Guards created within the system and placed onto the map.
The quick dispatch view is designed to allow users the ability to quickly dispatch guards to alarms without the need to open an event first. This removes the small delay in opening the alarm and dispatching the guard. It also provides quick visual identification of the status of all guards.
Configuration and Usage
Create a Dispatch View
To create a new view follow the below steps.
1. Navigate to the Sureview menu and select Views.

2. Once in views, click the “Add View” button at the top of the screen and click “Create New”.

3. Give your view a name, decide whether the view is public or private and select the size of the view you want. For a full screen view you can select 1x1.
4. Next select the quick dispatch option and add it to your view grid. It should look similar to below.

5. Once saved, your view will display and show a list of guards along with their current status. Similar to below. The list of guards can be sorted using the “sort” dropdown at the top right. They can be sorted by “callsign”, “Type” and "state" each ascending and descending.

Using the View
Currently in the screenshot above we can see there are 5 static guards( ) and 5 roaming guards(
 ).
).
- Static guards - remain in one location. e.g a reception or guard station.
- Roaming guard - patrol an area or route.
All guards can be controlled regardless of state. i.e settings a guard to static doesn't prevent them from being dispatched if needed. If you require further guard types you can speak to your Sureview rep to get them added.
All guards are currently set to available and be be set to one of 4 states:-
Available
The guard is available to be dispatched to events
Disaptched
The Guard has been dispatched to an event and is en-route
Investigating
The Guard has arrived at the event location and is actively investigating
Unavailable
The Guard is unavailable for dispatch (e.g. They are on a lunch break)
Upon receipt of an alarm into the system we can dispatch a guard. To do this click the dispatch button, this will show a short version of the alarm queue. Selecting the alarm will mark the guard as dispatched to the alarm. This will show on this screen by changing the guards state and starting a timer, as well as in the event itself in the audit trail.

Once the guard has reached the alarm they can check in that they have arrived and be set to investigating using the “investigating” button. This will change the guards state and start another timer.

Once a guard has completed their investigation and checked in they can be set back to available using the “Available” button.
If you need to dispatch a guard to a location that isn’t tied to an event you can perform a manual raise directly in the quick dispatch plug in. To do so, click Dispatch and scroll down to manual raise, complete the manual raise pop up box and click OK. This raises the event into the queue and immediately dispatches the guard.

If a guard becomes unavailable their state can be changed using the “unavailable” button or drop down to select a specific reason.

If you need to add further information to a guard this can be done by selecting the “note” option. This will bring up a pop up box with which you can add a note and see any previous notes added.

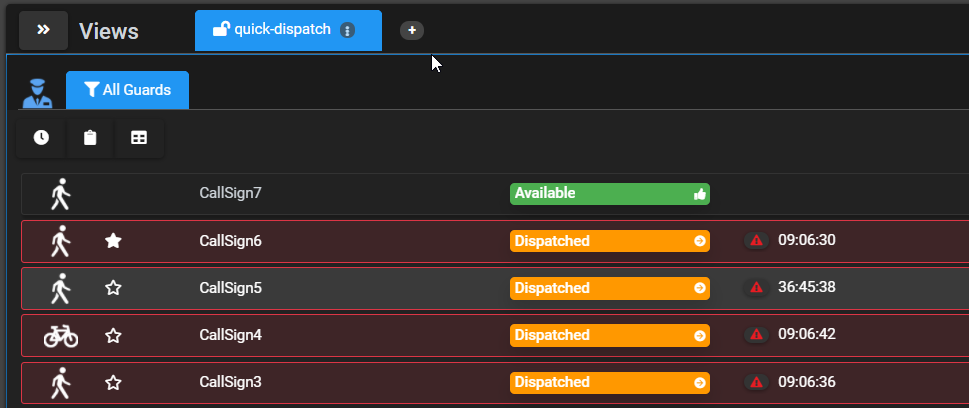
A dispatched guard can be assigned as an incident commander for a specific event. Next to the guard type icon, an unfilled star is located. Clicking this icon will assign the guard as an incident commander for the event they're attending. As a result, the star icon will become filled. Toggling this off will remove the guard as the incident commander and thus the star will return to its default state unfilled. An example of the star icon can be seen below.

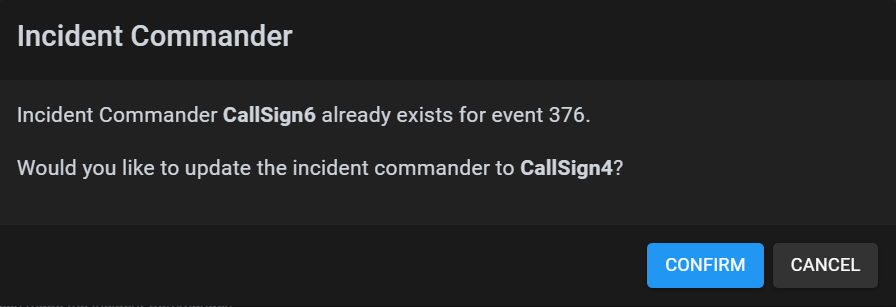
Only one guard can be assigned as an incident commander for an event. The incident commander can however be updated. This is done by clicking the unfilled star of another dispatched guard attending the same event. A confirmation modal will appear asking whether you would like to update the incident commander to the guard selected. Clicking the "Confirm" button will do so. An example of the modal can be seen below.

Further configuration

The three buttons allow you to configure the alert thresholds, view and edit shift notes and toggle the audit view.
Configure alert thresholds allow you to specify the length of time you expect a guard to take travelling to an alarm location or unavailable. Clicking the button will show a pop up box allowing you to specify these thresholds. The tick box “ always sort by guards in alert” will move guards to the top of the list when they have breached the threshold.

The threshold time can be used to alert operators that there may be an issue with a guard. Perhaps a guard has taken longer than expected to reach the alarm location or forgotten to check in. When the timer for “dispatched” or “unavailable” state has breached the guard will be highlighted in red and an exclamation mark will be shown.

“View and edit shift notes” allows you to enter a note that will be showing the dispatch screens audit log. It can be used to add information available to everyone on the screen. To view the audit log simply click on the “View audit log” button and it will appear at the bottom of the screen.


Comments
0 comments
Please sign in to leave a comment.